How to remove a tick
understanding the life cycle of a tick

How to remove a tick and dealing with ticks in general is one of the challenges of hiking on the south shore.

In times past, ticks such as the brown dog tick were common and merely an annoyance as their harm to humans was minimal.
However here on the south shore of Massachusetts the deer population has exploded. This has led to a high occurrence of the black legged tick, the tick that prefers deer as a host and is commonly called a deer tick.
This is of particular concern as these ticks many times carry Lyme disease. When disease is involved it is important to know how to remove a tick most efficiently. There is a growing concern that ticks in general are carrying diseases more regularly and this problem is on the rise!
With this concern in mind, and that the south shore is a primary breeding area for the black legged tick, the focus of this page will be on the deer tick.
What I have found personally helpful in dealing with and how to remove a tick is to know it's life cycle and general knowledge about them.
Here are some helpful general facts about ticks:
- Not active below 35 degrees ( that means even in winter if the temps rise above freezing you may find tick activity)
- Adult ticks hang on bushes 2-3 feet from the ground
- Will also use tall grasses
- Can be found in your own back yard not just the forest
- Younger ticks are found under leaves, under ground cover plants, on stone walls or in wood piles
- They have a two year cycle
- Part of the spider family
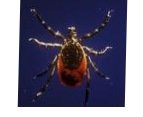
- Are black with black legs with the exception of the female adult whose body turns amber at maturity
- Deer ticks are not born with Lyme disease
- It takes 24-36 hours for a tick to find it's preferred spot and be fully engaged to pass the disease on
- This same tick can also carry Rocky Mountain Spotted Fever in the Midwestern states of the USA
There are three stages to a deer ticks' life
cycle to be concerned with as a hiker of the south shore hiking trails.
Other informational sites will say there are four stages and include the stage of egg. Though this is technically correct, the eggs stage is not a hiking hazard.
Nor does one need the advise of how to remove a tick at the egg stage!
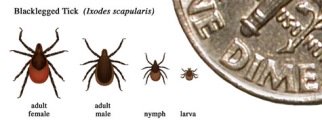
The three stages we are concerned with are called the Larva, Nymph and Adult stage. They eat only once during each of these phases. During each feeding the tick grows in size.
It is generally thought that the Nymph phase is the most likely phase for humans
to contract Lyme disease.
Here's the thinking:
Larva are not born with the Lyme disease (generally) so even if one attaches to you at this stage the chances of Lyme disease being contracted is very low.
At the Nymph stage, the creature has had one feeding and MAY have contracted the disease, the size though bigger is still extremely small and many times goes undetected. The adult tick though most likely by this point is infected, it is large enough to be easily detected and removed.
The life cycle of ticks and their most active times

Larva:
These are about the size of a period at the end of a sentence. Active mid to late summer. The eggs have been laid in the spring and hatch in the summer. These
are the ticks that are most likely found under leaves. Their host at this level is usually the white footed mouse.
Mice are also the animal most responsible for the Lyme disease spirocheta (bacteria). Once it has fed it drops from it's host and again goes under leaf cover. It then molts and becomes a Nymph and becomes tan or beige colored. It remains inactive throughout the fall, winter and early spring.
Nymph:
Active all summer. About the size of a poppy seed. Beginning in late spring they will also find vegetation close to the ground or stones or wood piles to help
them find their next host. Their host may once again be a mouse or any small mammal they can attach themselves to.
Feeding at this stage will last 4-5 days. This is when they will swell to many times their size to become an adult. Once fed they again drop off into the leaf litter and molt into an adult tick.
Adult:
Active in the spring and fall OR any time the weather is above 35 degrees! About the size of an apple seed. This is when they will seek vegetation that is 3 feet tall. Their preferred host is a deer. In fact their full life cycle is dependent on a final feeding of a white tailed deer. Once the female receives the final feeding they once again drop into the leaf litter and in the spring they mate and lay an estimated 2000 eggs. The male only sparingly feeds at this cycle.
Symptoms of Lyme disease are:

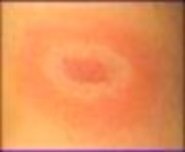
- The well known bulls eye rash spreading from the site of the bite (though this does not always appear)
- Headache
- flu like symptoms
- swelling or pain of the joints
These symptoms can start anywhere from 3 days after the bite to 4 weeks later.
If you are in doubt whether it is a deer tick that has attached, save the tick if possible and make a trip to your doctor. Remember they have to attach and start the feeding to be able to spread the Lyme disease to you. Usually takes 24-36 hours. Some authorities even say up to 48 hours. Learning how to remove a tick in the proper way before this timing leaves encounters with deer ticks as only an annoyance.
My personal experience with Lyme:
The summer of 2015 I contracted Lyme disease twice. Both times it was caught early, medicated and caused me no lasting problems. Though I did find it is a tenacious bacteria that will leave no one without a bit of a struggle.
I did not get the flu like symptoms or the swelling of joints, though I have a bit of joint problem usually anyway, there was nothing beyond the usual.
I did not need the information about how to remove a tick as I had never found the tick on my body.
The site of the bite was at first red, then grew in size and then proceeded to turn into the bulls eye appearance but much more subtle than the picture above.
The most noticeable symptom for me was the itch. Wake you up at night and keep you up kind of itch! Once the itch was gone there was a bit of soreness at the site.
Even after the antibiotics were exhausted the site remained red for several days making me think I needed more, but after several days it did leave.
The second bout was like the first, except the site was under my knee cap. I would have never noticed except for the incredible itch arrived once again.
I am hoping that sharing my experience will help other before it can get any further than the initial stages.
How to remove a tick:
The experts say that the best way to remove a tick is to use a set of pointy tweezers and use firm upward pressure getting as close to the mouth as possible or as low on the skin as possible. It is said that side to side motion or other measures such as using Vaseline or heat from a newly extinguished match are not as safe to remove a tick.
This may cause the tick to regurgitate causing the bacteria filled saliva into your blood stream. Many use the side to side motion to remove a tick. This is almost instinctual as the ticks use barbs at their mouths that lock themselves into the hosts' skin making removal difficult,but again is not a safe method. Using firm upward motion is best. These videos from the American Lyme Disease Foundation will provide more information.
This shows how well they attach themselves.
The front part of the tick with a different color is where the head is. To the front of that is a straw like mouth with two barbs for digging. Many times when you pull a tick, out the mouth piece may still remain.
I always thought that this was the head and I did not rest easy until it was removed as well. Though from my reading, I understood this is not a safety hazard, most people will want it removed, but the skin will push these out naturally.
The best measure in how to remove a tick is to prevent them in the first place!
One website I researched learning how to remove a tick and their prevention, suggested the use of clothing that had tick repellent built in. The repellent is called Permethrin. Though it may be effective, I know of many who would not want a chemical permeated in their clothing. Using a spray containing this before heading into the woods would also be of value. Any insect repellent that contains at least 20% Deet will also be effective for tick prevention.
For those who absolutely do not want to use chemicals my research brought these ideas:
A natural spray that can be made at home uses 4 tblsp veg. oil, 2 tblsp.aloe vera gel and 30- 40 drops of either geranium or lavender essential oil or a combination of both mixed together in a spray bottle. Shake well before using.
Another version is one cup water, half cup apple cider vinegar and 10 drops of either of these oils.
other ingredients that are claimed to be repugnent to ticks
- Neem oil ( needs to be used within 8 hours after mixing as it loses potentcy)
Citrus, - Garlic
- Peppermint
With the citrus boil two cups of water add any combination of citrus slices you desire (two full fruits or amount to equal) simmer one hour, strain into spray bottle.
Garlic may be too much in a spray but garlic pills may help to make you a naturally unattractive host to ticks!
Peppermint as well as any mint including tea tree oil, wintergreen, and sweet birch oil are my favorite to ward off any pest. Most insects including mosquitoes do not like mint.
These measures are for humans, essential oils are toxic to cats, though most dogs will tolerate these sprays it is best to seek the advise of your vet.
One vet site I visited also included these: garlic, cinnamon and clove as good tick deterrents though again cats and garlic do not mix.
And yet another suggested lemon grass, eucalyptus and water mixed as a spray.
The best prevention in my experience is a thorough check after being outdoors. When learning how to remove a tick the first step is finding them! Use a flashlight as deer ticks are hard bodied and there bodies will reflect light. Dead give away that it is a tick and not just debris from a hike! Along with noticing that the "debris" does not easily brush away.
Ticks instinctively head for the head or ears but may attach any where where the skin is thin or they feel they may not be detected or removed easily.
Wearing light colored clothing and hiking in areas with well maintained trails are also preventative measures.
Many times it is suggested to wear long sleeved or long pants even tucking them into socks. That may help in making their site selection a longer process, but in hot weather I don't see anyone adhering to these measures.
Certainly it won't stop them either. Between the size of the creature which at the larva or nymph stage can probably just crawl through the woven material of most clothing. The fact that they burrow through your 7 layers of skin, supports this theory!
Early in the spring I did quite a bit of hiking. It was cool. I had the long sleeved clothing and long pants, knee high hiking socks, boots and a light jacket. I still found ticks on my mid section.
And yes they were deer ticks! They were found and the ticks removed that day.
My experience is taking the time to check and remove any ticks found that day is the best protection against Lyme disease.
And learning how to remove a tick in the best way keeps this hiking danger to a minimum!!
- South Shore Hiking Trails ›
- Hiking Tips ›
- Remove a tick


New! Comments
Have your say about what you just read! Leave me a comment in the box below.